class: left, bottom, title-slide .title[ # Assembling Your Dream Theme ] .subtitle[ ## Crafting Custom Designs in ggplot2 for Effortless Visualisation Enhancement ] .author[ ### Long Nguyen & Andreas Neumann ] .date[ ### 2024-05-28 ] --- <!-- View slides at https://lo-ng.netlify.app/slides/2024-05-28-correlaid-ggplot2-theming --> <style>.xe__progress-bar__container { bottom:0; opacity: 1; position:absolute; right:0; left: 0; } .xe__progress-bar { height: 5px; background-color: #d295ad; width: calc(var(--slide-current) / var(--slide-total) * 100%); } .remark-visible .xe__progress-bar { animation: xe__progress-bar__wipe 200ms forwards; animation-timing-function: cubic-bezier(.86,0,.07,1); } @keyframes xe__progress-bar__wipe { 0% { width: calc(var(--slide-previous) / var(--slide-total) * 100%); } 100% { width: calc(var(--slide-current) / var(--slide-total) * 100%); } }</style> ## Why create ggplot2 themes and colour scales? - What Andreas said -- - Save time  --- ## Prerequisites .pull-left.w33[ - {tidyverse}, which includes (among others): - {ggplot2} - [{ragg}](https://www.tidyverse.org/tags/ragg/): high-quality graphic backend for R - [{systemfonts}](https://www.tidyverse.org/tags/systemfonts/): finds the correct font file for a specific font and style (we'll see it in action later) ] .pull-right.w67.center[ - In RStudio **Global Options** → **Graphics**, choose **AGG** as Backend  ] --- count: false .panel1-penguins-auto[ ```r *library(ggplot2) ``` ] .panel2-penguins-auto[ ] --- count: false .panel1-penguins-auto[ ```r library(ggplot2) *library(palmerpenguins) ``` ] .panel2-penguins-auto[ ] --- count: false .panel1-penguins-auto[ ```r library(ggplot2) library(palmerpenguins) *p <- ggplot( * data = penguins, * aes(bill_length_mm, bill_depth_mm) *) ``` ] .panel2-penguins-auto[ ] --- count: false .panel1-penguins-auto[ ```r library(ggplot2) library(palmerpenguins) p <- ggplot( data = penguins, aes(bill_length_mm, bill_depth_mm) ) + * geom_point( * aes(colour = species), * size = 2 * ) ``` ] .panel2-penguins-auto[ ] --- count: false .panel1-penguins-auto[ ```r library(ggplot2) library(palmerpenguins) p <- ggplot( data = penguins, aes(bill_length_mm, bill_depth_mm) ) + geom_point( aes(colour = species), size = 2 ) + * labs( * title = "Title", * subtitle = "Subtitle", * caption = "Caption" * ) ``` ] .panel2-penguins-auto[ ] --- count: false .panel1-penguins-auto[ ```r library(ggplot2) library(palmerpenguins) p <- ggplot( data = penguins, aes(bill_length_mm, bill_depth_mm) ) + geom_point( aes(colour = species), size = 2 ) + labs( title = "Title", subtitle = "Subtitle", caption = "Caption" ) *p ``` ] .panel2-penguins-auto[ <img src="2024-05-28-correlaid-ggplot2-theming_files/figure-html/penguins_auto_06_output-1.png" alt="Scatterplot of bill length by bill depth of 3 penguin species" width="96%" style="display: block; margin: auto;" /> ] <style> .panel1-penguins-auto { color: black; width: 38.6060606060606%; hight: 32%; float: left; padding-left: 1%; font-size: 80% } .panel2-penguins-auto { color: black; width: 59.3939393939394%; hight: 32%; float: left; padding-left: 1%; font-size: 80% } .panel3-penguins-auto { color: black; width: NA%; hight: 33%; float: left; padding-left: 1%; font-size: 80% } </style> --- .pull-left.w42[ <br> > The easiest way to extend ggplot2 is to make a new theme. > > .small[— Thomas Lin Pedersen, [*Extending your ability to extend ggplot2*](https://www.rstudio.com/resources/rstudioconf-2020/extending-your-ability-to-extend-ggplot2/)] ] .pull-right.w55[  ] --- class: inverse center middle # Themes --- class: inverse center middle ## Arguments of the `theme()` function --- class: middle - Familiarise yourself with the [`theme()` function documentation](https://ggplot2.tidyverse.org/reference/theme.html) ```r ?theme ``` --- count: false .panel1-theme-interactive-non_seq[ ```r p ``` ] .panel2-theme-interactive-non_seq[ <img src="2024-05-28-correlaid-ggplot2-theming_files/figure-html/theme-interactive_non_seq_01_output-1.png" alt="Modifying the theme of a plot interactively by calling theme_minimal() and theme()" width="96%" style="display: block; margin: auto;" /> ] --- count: false .panel1-theme-interactive-non_seq[ ```r p + * theme_minimal( * ) ``` ] .panel2-theme-interactive-non_seq[ <img src="2024-05-28-correlaid-ggplot2-theming_files/figure-html/theme-interactive_non_seq_02_output-1.png" alt="Modifying the theme of a plot interactively by calling theme_minimal() and theme()" width="96%" style="display: block; margin: auto;" /> ] --- count: false .panel1-theme-interactive-non_seq[ ```r p + theme_minimal( * base_size = 14, ) ``` ] .panel2-theme-interactive-non_seq[ <img src="2024-05-28-correlaid-ggplot2-theming_files/figure-html/theme-interactive_non_seq_03_output-1.png" alt="Modifying the theme of a plot interactively by calling theme_minimal() and theme()" width="96%" style="display: block; margin: auto;" /> ] --- count: false .panel1-theme-interactive-non_seq[ ```r p + theme_minimal( base_size = 14, * base_family = "Atkinson Hyperlegible" ) ``` ] .panel2-theme-interactive-non_seq[ <img src="2024-05-28-correlaid-ggplot2-theming_files/figure-html/theme-interactive_non_seq_04_output-1.png" alt="Modifying the theme of a plot interactively by calling theme_minimal() and theme()" width="96%" style="display: block; margin: auto;" /> ] --- count: false .panel1-theme-interactive-non_seq[ ```r p + theme_minimal( base_size = 14, base_family = "Atkinson Hyperlegible" ) + * theme( * legend.position = "top", * ) ``` ] .panel2-theme-interactive-non_seq[ <img src="2024-05-28-correlaid-ggplot2-theming_files/figure-html/theme-interactive_non_seq_05_output-1.png" alt="Modifying the theme of a plot interactively by calling theme_minimal() and theme()" width="96%" style="display: block; margin: auto;" /> ] --- count: false .panel1-theme-interactive-non_seq[ ```r p + theme_minimal( base_size = 14, base_family = "Atkinson Hyperlegible" ) + theme( legend.position = "top", * plot.title.position = "plot", ) ``` ] .panel2-theme-interactive-non_seq[ <img src="2024-05-28-correlaid-ggplot2-theming_files/figure-html/theme-interactive_non_seq_06_output-1.png" alt="Modifying the theme of a plot interactively by calling theme_minimal() and theme()" width="96%" style="display: block; margin: auto;" /> ] --- count: false .panel1-theme-interactive-non_seq[ ```r p + theme_minimal( base_size = 14, base_family = "Atkinson Hyperlegible" ) + theme( legend.position = "top", plot.title.position = "plot", * plot.title = element_text( * size = rel(1.5) * ), ) ``` ] .panel2-theme-interactive-non_seq[ <img src="2024-05-28-correlaid-ggplot2-theming_files/figure-html/theme-interactive_non_seq_07_output-1.png" alt="Modifying the theme of a plot interactively by calling theme_minimal() and theme()" width="96%" style="display: block; margin: auto;" /> ] --- count: false .panel1-theme-interactive-non_seq[ ```r p + theme_minimal( base_size = 14, base_family = "Atkinson Hyperlegible" ) + theme( legend.position = "top", plot.title.position = "plot", plot.title = element_text( size = rel(1.5) ), * panel.grid.minor = element_blank() ) ``` ] .panel2-theme-interactive-non_seq[ <img src="2024-05-28-correlaid-ggplot2-theming_files/figure-html/theme-interactive_non_seq_08_output-1.png" alt="Modifying the theme of a plot interactively by calling theme_minimal() and theme()" width="96%" style="display: block; margin: auto;" /> ] <style> .panel1-theme-interactive-non_seq { color: black; width: 38.6060606060606%; hight: 32%; float: left; padding-left: 1%; font-size: 80% } .panel2-theme-interactive-non_seq { color: black; width: 59.3939393939394%; hight: 32%; float: left; padding-left: 1%; font-size: 80% } .panel3-theme-interactive-non_seq { color: black; width: NA%; hight: 33%; float: left; padding-left: 1%; font-size: 80% } </style> --- class: inverse center middle ## Writing a theme function --- We can simply pack the regular R code for theming into a function and save ourselves from mindless repeating or copy-pasting! ```r my_theme <- function(base_size = 14, base_family = "Atkinson Hyperlegible") { theme_minimal(base_size = base_size, base_family = base_family) + theme( legend.position = "top", plot.title.position = "plot", plot.title = element_text(size = rel(1.5)), panel.grid.minor = element_blank() ) } ``` --- count: false .panel1-use-mytheme-non_seq[ ```r p ``` ] .panel2-use-mytheme-non_seq[ <img src="2024-05-28-correlaid-ggplot2-theming_files/figure-html/use-mytheme_non_seq_01_output-1.png" alt="Applying the theme defined in the my_theme() function to a plot" width="96%" style="display: block; margin: auto;" /> ] --- count: false .panel1-use-mytheme-non_seq[ ```r p + * my_theme( * ) ``` ] .panel2-use-mytheme-non_seq[ <img src="2024-05-28-correlaid-ggplot2-theming_files/figure-html/use-mytheme_non_seq_02_output-1.png" alt="Applying the theme defined in the my_theme() function to a plot" width="96%" style="display: block; margin: auto;" /> ] --- count: false .panel1-use-mytheme-non_seq[ ```r p + my_theme( * base_size = 20, ) ``` ] .panel2-use-mytheme-non_seq[ <img src="2024-05-28-correlaid-ggplot2-theming_files/figure-html/use-mytheme_non_seq_03_output-1.png" alt="Applying the theme defined in the my_theme() function to a plot" width="96%" style="display: block; margin: auto;" /> ] --- count: false .panel1-use-mytheme-non_seq[ ```r p + my_theme( base_size = 20, * base_family = "Menlo" ) ``` ] .panel2-use-mytheme-non_seq[ <img src="2024-05-28-correlaid-ggplot2-theming_files/figure-html/use-mytheme_non_seq_04_output-1.png" alt="Applying the theme defined in the my_theme() function to a plot" width="96%" style="display: block; margin: auto;" /> ] --- count: false .panel1-use-mytheme-non_seq[ ```r p + my_theme( base_size = 20, base_family = "Menlo" ) + * theme( * plot.title = element_text( * face = "bold" * ) * ) ``` ] .panel2-use-mytheme-non_seq[ <img src="2024-05-28-correlaid-ggplot2-theming_files/figure-html/use-mytheme_non_seq_05_output-1.png" alt="Applying the theme defined in the my_theme() function to a plot" width="96%" style="display: block; margin: auto;" /> ] <style> .panel1-use-mytheme-non_seq { color: black; width: 38.6060606060606%; hight: 32%; float: left; padding-left: 1%; font-size: 80% } .panel2-use-mytheme-non_seq { color: black; width: 59.3939393939394%; hight: 32%; float: left; padding-left: 1%; font-size: 80% } .panel3-use-mytheme-non_seq { color: black; width: NA%; hight: 33%; float: left; padding-left: 1%; font-size: 80% } </style> --- class: inverse center middle ## More customisations for your theme function<br>(on top of passing arguments to `theme()`) --- ### Example: Showing/hiding gridlines more easily (Inspired by [hrbrthemes](https://github.com/hrbrmstr/hrbrthemes)) ```r my_theme <- function(base_size = 14, base_family = "Atkinson Hyperlegible", * grid = "XY") { t <- theme_minimal(base_size = base_size, base_family = base_family) + theme( legend.position = "top", plot.title.position = "plot", plot.title = element_text(size = rel(1.5)) ) * if (!grepl("X", grid)) t <- t + theme(panel.grid.major.x = element_blank()) * if (!grepl("Y", grid)) t <- t + theme(panel.grid.major.y = element_blank()) * if (!grepl("x", grid)) t <- t + theme(panel.grid.minor.x = element_blank()) * if (!grepl("y", grid)) t <- t + theme(panel.grid.minor.y = element_blank()) * t } ``` --- count: false .panel1-use-mytheme-grid-rotate[ ```r p + * my_theme() ``` ] .panel2-use-mytheme-grid-rotate[ <img src="2024-05-28-correlaid-ggplot2-theming_files/figure-html/use-mytheme-grid_rotate_01_output-1.png" alt="Applying the theme defined in the my_theme() function to a plot – now with the grid argument to show/hide gridlines more easily" width="96%" style="display: block; margin: auto;" /> ] --- count: false .panel1-use-mytheme-grid-rotate[ ```r p + * my_theme(grid = "Y") ``` ] .panel2-use-mytheme-grid-rotate[ <img src="2024-05-28-correlaid-ggplot2-theming_files/figure-html/use-mytheme-grid_rotate_02_output-1.png" alt="Applying the theme defined in the my_theme() function to a plot – now with the grid argument to show/hide gridlines more easily" width="96%" style="display: block; margin: auto;" /> ] --- count: false .panel1-use-mytheme-grid-rotate[ ```r p + * my_theme(grid = "Xx") ``` ] .panel2-use-mytheme-grid-rotate[ <img src="2024-05-28-correlaid-ggplot2-theming_files/figure-html/use-mytheme-grid_rotate_03_output-1.png" alt="Applying the theme defined in the my_theme() function to a plot – now with the grid argument to show/hide gridlines more easily" width="96%" style="display: block; margin: auto;" /> ] --- count: false .panel1-use-mytheme-grid-rotate[ ```r p + * my_theme(grid = "xy") ``` ] .panel2-use-mytheme-grid-rotate[ <img src="2024-05-28-correlaid-ggplot2-theming_files/figure-html/use-mytheme-grid_rotate_04_output-1.png" alt="Applying the theme defined in the my_theme() function to a plot – now with the grid argument to show/hide gridlines more easily" width="96%" style="display: block; margin: auto;" /> ] <style> .panel1-use-mytheme-grid-rotate { color: black; width: 38.6060606060606%; hight: 32%; float: left; padding-left: 1%; font-size: 80% } .panel2-use-mytheme-grid-rotate { color: black; width: 59.3939393939394%; hight: 32%; float: left; padding-left: 1%; font-size: 80% } .panel3-use-mytheme-grid-rotate { color: black; width: NA%; hight: 33%; float: left; padding-left: 1%; font-size: 80% } </style> --- class: inverse center middle ## Making sure that fonts work --- Applying an unavailable font just quietly falls back to default font (or throws errors depending on your OS and graphics device). .pull-left.w41[ ```r p + my_theme( base_family = "Expensive Designer Font" ) ``` ] .pull-right.w57[ <img src="2024-05-28-correlaid-ggplot2-theming_files/figure-html/unnamed-chunk-1-1.png" alt="Applying an unavailable font just quietly falls back to default font." width="96%" style="display: block; margin: auto;" /> ] --- We can control this behaviour and make it explicit using `systemfonts::system_fonts()`: ```r my_theme <- function(base_size = 14, base_family = "Atkinson Hyperlegible", grid = "XY") { if (!(base_family %in% systemfonts::system_fonts()$family)) { message("Font '", base_family, "' not installed.\nUsing system's default font.") base_family <- "" } [...] } ``` --- .pull-left.w41[ ```r p + my_theme( base_family = "Expensive Designer Font" ) ``` ] .pull-right.w57[ ``` #> Font 'Expensive Designer Font' not installed. #> Using system's default font. ``` <img src="2024-05-28-correlaid-ggplot2-theming_files/figure-html/unnamed-chunk-2-1.png" alt="Applying an unavailable font throws a message and falls back to default font" width="96%" style="display: block; margin: auto;" /> ] --- class: inverse center middle ## Enabling extra font features --- layout: true ### Example: tabular numbers (or monospaced digits) --- Tabular numbers are monospaced, which keeps their sizes consistent for display on axes 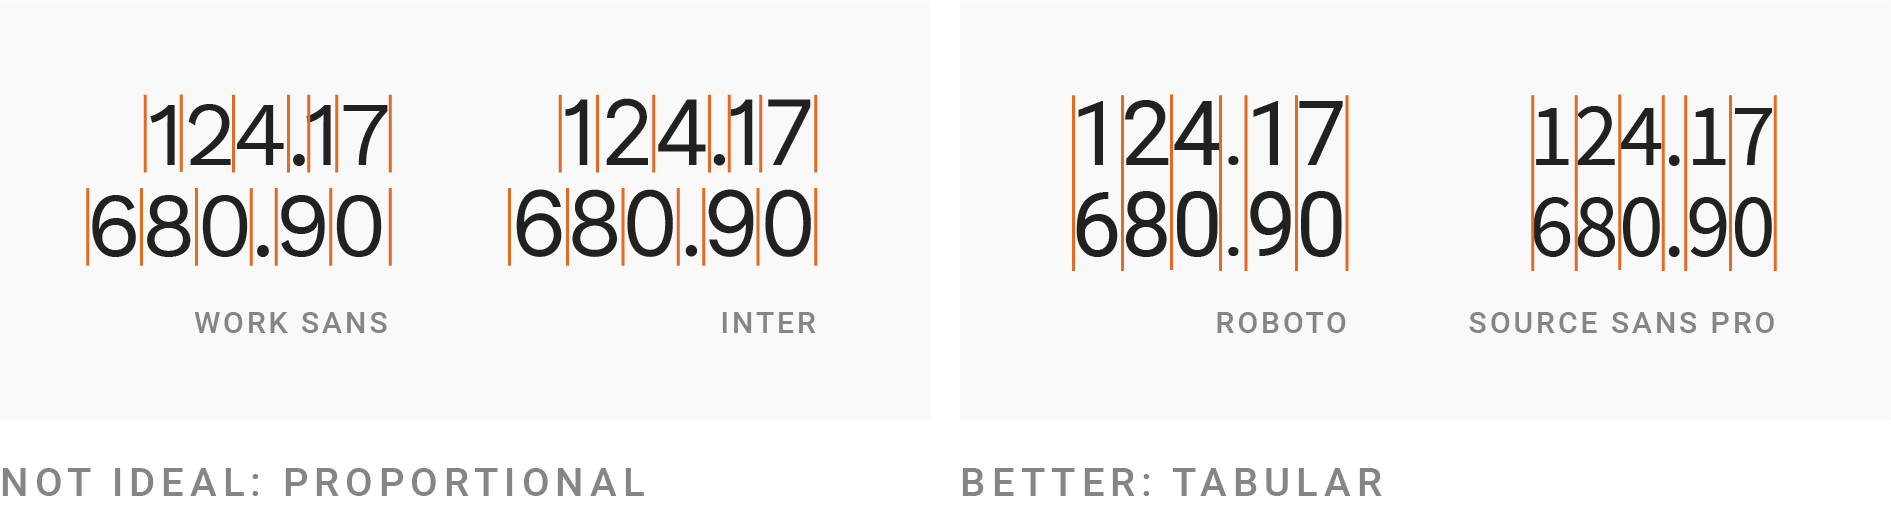 .center[(Source: https://blog.datawrapper.de/fonts-for-data-visualization/)] --- - Solution 1: choose fonts with tabular numbers enabled by default --- - Solution 2: use {systemfonts} enable tabular numbers (if your font has this feature and it is not enabled by default) ```r library(systemfonts) register_font( "Atkinson Hyperlegible tnum", "/path/to/Atkinson-Hyperlegible.otf", features = font_feature(numbers = "tabular") ) ``` The newly registered font can be found in `registry_fonts()` (instead of `system_fonts`). New fallback condition: ```r !(base_family %in% c( systemfonts::system_fonts()$family, systemfonts::registry_fonts()$family )) ``` --- count: false .panel1-tnum-fonts-rotate[ ```r p + my_theme(base_family = * "Atkinson Hyperlegible", ) ``` ] .panel2-tnum-fonts-rotate[ <img src="2024-05-28-correlaid-ggplot2-theming_files/figure-html/tnum-fonts_rotate_01_output-1.png" alt="Applying the theme defined in the my_theme() function to a plot – now with the grid argument to show/hide gridlines more easily" width="96%" style="display: block; margin: auto;" /> ] --- count: false .panel1-tnum-fonts-rotate[ ```r p + my_theme(base_family = * "Menlo", ) ``` ] .panel2-tnum-fonts-rotate[ <img src="2024-05-28-correlaid-ggplot2-theming_files/figure-html/tnum-fonts_rotate_02_output-1.png" alt="Applying the theme defined in the my_theme() function to a plot – now with the grid argument to show/hide gridlines more easily" width="96%" style="display: block; margin: auto;" /> ] --- count: false .panel1-tnum-fonts-rotate[ ```r p + my_theme(base_family = * "Atkinson Hyperlegible tnum", ) ``` ] .panel2-tnum-fonts-rotate[ <img src="2024-05-28-correlaid-ggplot2-theming_files/figure-html/tnum-fonts_rotate_03_output-1.png" alt="Applying the theme defined in the my_theme() function to a plot – now with the grid argument to show/hide gridlines more easily" width="96%" style="display: block; margin: auto;" /> ] --- count: false .panel1-tnum-fonts-rotate[ ```r p + my_theme(base_family = * "Atkinson Hyperlegible", ) ``` ] .panel2-tnum-fonts-rotate[ <img src="2024-05-28-correlaid-ggplot2-theming_files/figure-html/tnum-fonts_rotate_04_output-1.png" alt="Applying the theme defined in the my_theme() function to a plot – now with the grid argument to show/hide gridlines more easily" width="96%" style="display: block; margin: auto;" /> ] <style> .panel1-tnum-fonts-rotate { color: black; width: 38.6060606060606%; hight: 32%; float: left; padding-left: 1%; font-size: 80% } .panel2-tnum-fonts-rotate { color: black; width: 59.3939393939394%; hight: 32%; float: left; padding-left: 1%; font-size: 80% } .panel3-tnum-fonts-rotate { color: black; width: NA%; hight: 33%; float: left; padding-left: 1%; font-size: 80% } </style> --- class: middle layout: false Check out the `theme_correlaid()` function: https://github.com/CorrelAid/correltools/blob/main/R/ggplot-theme.R --- class: inverse center middle ## Hands-on session Create your own theme function! 💻🚀 --- class: inverse center middle # Colour scales --- ## Colour palettes #### Sequential palette based on CorrelAid logo <span class="color-preview" style="background-color: #BCD259FF"></span><code>#bcd259</code><span class="color-preview" style="background-color: #6FA07FFF"></span><code>#6fa07f</code><span class="color-preview" style="background-color: #214F8FFF"></span><code>#214f8f</code> #### Sequential palette based on CorrelAidX logo <span class="color-preview" style="background-color: #F04451FF"></span><code>#f04451</code><span class="color-preview" style="background-color: #85638CFF"></span><code>#85638c</code><span class="color-preview" style="background-color: #214F8FFF"></span><code>#214f8f</code> -- #### Qualitative palette <span class="color-preview" style="background-color: #96C342FF"></span><code>#96c342</code><span class="color-preview" style="background-color: #3863A2FF"></span><code>#3863a2</code><span class="color-preview" style="background-color: #F04451FF"></span><code>#f04451</code> #### Greyscale palette <span class="color-preview" style="background-color: #3C3C3BFF"></span><code>#3c3c3b</code><span class="color-preview" style="background-color: #727375FF"></span><code>#727375</code><span class="color-preview" style="background-color: #9E9FA3FF"></span><code>#9e9fa3</code><span class="color-preview" style="background-color: #CDCED0FF"></span><code>#cdced0</code> --- ## Steps to create a colour scale function 1. Save the colour palette(s) as charactor vector(s) 1. Create a [function factory](https://adv-r.hadley.nz/function-factories.html) that outputs a palette with the desired number of colours 1. Create a scale function by wrapping a scale constructor (e.g., `ggplot2::continuous_scale()`) around the palette function in step 2 --- ### Step 1 ```r correlaid_colours <- list( gradient = c("#bcd259", "#6fa07f", "#214f8f"), gradient_x = c("#f04451", "#85638c", "#214f8f"), qualitative = c("#96c342", "#3863a2", "#f04451"), grey = c("#3c3c3b", "#727375", "#9e9fa3", "#cdced0") ) ``` --- ### Step 2 ```r correlaid_pal <- function(direction = 1, option = "qualitative") { stopifnot(length(option) == 1 && option %in% names(correlaid_colours)) cols <- correlaid_colours[[option]] function(n) { cols <- grDevices::colorRampPalette(cols, space = "Lab", interpolate = "spline")(n) if (direction < 0) rev(cols) else cols } } ``` - Takes two argument: `option` (which colour palette?) and `direction` (revert or not?) - Returns a function that takes the desired number of colours (e.g., number of categories) and produces as many colours by interpolation --- ### Step 2 ```r correlaid_pal()(n = 2) ``` <span class="color-preview" style="background-color: #96C341FF"></span><code>#96C341</code><span class="color-preview" style="background-color: #F04451FF"></span><code>#F04451</code> ```r correlaid_pal(option = "gradient")(n = 7) ``` <span class="color-preview" style="background-color: #BBD259FF"></span><code>#BBD259</code><span class="color-preview" style="background-color: #A0C568FF"></span><code>#A0C568</code><span class="color-preview" style="background-color: #86B475FF"></span><code>#86B475</code><span class="color-preview" style="background-color: #6E9F7FFF"></span><code>#6E9F7F</code><span class="color-preview" style="background-color: #588786FF"></span><code>#588786</code><span class="color-preview" style="background-color: #406C8BFF"></span><code>#406C8B</code><span class="color-preview" style="background-color: #204E8EFF"></span><code>#204E8E</code> ```r correlaid_pal(direction = -1, option = "gradient")(n = 7) ``` <span class="color-preview" style="background-color: #204E8EFF"></span><code>#204E8E</code><span class="color-preview" style="background-color: #406C8BFF"></span><code>#406C8B</code><span class="color-preview" style="background-color: #588786FF"></span><code>#588786</code><span class="color-preview" style="background-color: #6E9F7FFF"></span><code>#6E9F7F</code><span class="color-preview" style="background-color: #86B475FF"></span><code>#86B475</code><span class="color-preview" style="background-color: #A0C568FF"></span><code>#A0C568</code><span class="color-preview" style="background-color: #BBD259FF"></span><code>#BBD259</code> --- ### Step 3 ```r scale_colour_correlaid_d <- function(direction = 1, option = "qualitative", ...) { ggplot2::discrete_scale( aesthetics = "colour", scale_name = "correlaid", palette = correlaid_pal(direction, option), ... ) } ``` -- - Same for `scale_fill_correlaid_d` --- ### Step 3 ```r scale_colour_correlaid_c <- function(direction = 1, option = "gradient", guide = "colourbar", ...) { ggplot2::continuous_scale( aesthetics = "colour", scale_name = "correlaid", palette = scales::gradient_n_pal(correlaid_pal(direction, option)(8)), guide = guide, ... ) } ``` --- .pull-left.w39[ ```r p + scale_colour_correlaid_d() ``` ] .pull-right.w59[ <img src="2024-05-28-correlaid-ggplot2-theming_files/figure-html/unnamed-chunk-9-1.png" alt="Applying the defined colour scales functions to a plot" width="96%" style="display: block; margin: auto;" /> ] --- As expected, applying a continuous colour scale to a discrete variable throws an error: ```r p + scale_colour_correlaid_c() ``` ``` #> Error in `scale_colour_correlaid_c()`: #> ! Discrete values supplied to continuous scale. #> ℹ Example values: Adelie, Adelie, Adelie, Adelie, and Adelie ``` --- class: middle Check out the `scale_*_correlaid_*()` functions: https://github.com/CorrelAid/correltools/blob/main/R/ggplot-scales.R --- ## References and further resources - https://ggplot2-book.org/extensions.html - https://themockup.blog/posts/2020-12-26-creating-and-using-custom-ggplot2-themes/ - https://www.garrickadenbuie.com/blog/custom-discrete-color-scales-for-ggplot2/ - https://cedricscherer.netlify.app/2019/08/05/a-ggplot2-tutorial-for-beautiful-plotting-in-r/ - https://socviz.co/refineplots.html --- class: middle # Thank you! .small[ <svg viewBox="0 0 448 512" style="height:1em;position:relative;display:inline-block;top:.1em;" xmlns="http://www.w3.org/2000/svg"> <path d="M400 32H48C21.5 32 0 53.5 0 80v352c0 26.5 21.5 48 48 48h352c26.5 0 48-21.5 48-48V80c0-26.5-21.5-48-48-48zm-48.9 158.8c.2 2.8.2 5.7.2 8.5 0 86.7-66 186.6-186.6 186.6-37.2 0-71.7-10.8-100.7-29.4 5.3.6 10.4.8 15.8.8 30.7 0 58.9-10.4 81.4-28-28.8-.6-53-19.5-61.3-45.5 10.1 1.5 19.2 1.5 29.6-1.2-30-6.1-52.5-32.5-52.5-64.4v-.8c8.7 4.9 18.9 7.9 29.6 8.3a65.447 65.447 0 0 1-29.2-54.6c0-12.2 3.2-23.4 8.9-33.1 32.3 39.8 80.8 65.8 135.2 68.6-9.3-44.5 24-80.6 64-80.6 18.9 0 35.9 7.9 47.9 20.7 14.8-2.8 29-8.3 41.6-15.8-4.9 15.2-15.2 28-28.8 36.1 13.2-1.4 26-5.1 37.8-10.2-8.9 13.1-20.1 24.7-32.9 34z"></path></svg> <svg viewBox="0 0 448 512" style="height:1em;position:relative;display:inline-block;top:.1em;" xmlns="http://www.w3.org/2000/svg"> <path d="M400 32H48C21.5 32 0 53.5 0 80v352c0 26.5 21.5 48 48 48h352c26.5 0 48-21.5 48-48V80c0-26.5-21.5-48-48-48zM277.3 415.7c-8.4 1.5-11.5-3.7-11.5-8 0-5.4.2-33 .2-55.3 0-15.6-5.2-25.5-11.3-30.7 37-4.1 76-9.2 76-73.1 0-18.2-6.5-27.3-17.1-39 1.7-4.3 7.4-22-1.7-45-13.9-4.3-45.7 17.9-45.7 17.9-13.2-3.7-27.5-5.6-41.6-5.6-14.1 0-28.4 1.9-41.6 5.6 0 0-31.8-22.2-45.7-17.9-9.1 22.9-3.5 40.6-1.7 45-10.6 11.7-15.6 20.8-15.6 39 0 63.6 37.3 69 74.3 73.1-4.8 4.3-9.1 11.7-10.6 22.3-9.5 4.3-33.8 11.7-48.3-13.9-9.1-15.8-25.5-17.1-25.5-17.1-16.2-.2-1.1 10.2-1.1 10.2 10.8 5 18.4 24.2 18.4 24.2 9.7 29.7 56.1 19.7 56.1 19.7 0 13.9.2 36.5.2 40.6 0 4.3-3 9.5-11.5 8-66-22.1-112.2-84.9-112.2-158.3 0-91.8 70.2-161.5 162-161.5S388 165.6 388 257.4c.1 73.4-44.7 136.3-110.7 158.3zm-98.1-61.1c-1.9.4-3.7-.4-3.9-1.7-.2-1.5 1.1-2.8 3-3.2 1.9-.2 3.7.6 3.9 1.9.3 1.3-1 2.6-3 3zm-9.5-.9c0 1.3-1.5 2.4-3.5 2.4-2.2.2-3.7-.9-3.7-2.4 0-1.3 1.5-2.4 3.5-2.4 1.9-.2 3.7.9 3.7 2.4zm-13.7-1.1c-.4 1.3-2.4 1.9-4.1 1.3-1.9-.4-3.2-1.9-2.8-3.2.4-1.3 2.4-1.9 4.1-1.5 2 .6 3.3 2.1 2.8 3.4zm-12.3-5.4c-.9 1.1-2.8.9-4.3-.6-1.5-1.3-1.9-3.2-.9-4.1.9-1.1 2.8-.9 4.3.6 1.3 1.3 1.8 3.3.9 4.1zm-9.1-9.1c-.9.6-2.6 0-3.7-1.5s-1.1-3.2 0-3.9c1.1-.9 2.8-.2 3.7 1.3 1.1 1.5 1.1 3.3 0 4.1zm-6.5-9.7c-.9.9-2.4.4-3.5-.6-1.1-1.3-1.3-2.8-.4-3.5.9-.9 2.4-.4 3.5.6 1.1 1.3 1.3 2.8.4 3.5zm-6.7-7.4c-.4.9-1.7 1.1-2.8.4-1.3-.6-1.9-1.7-1.5-2.6.4-.6 1.5-.9 2.8-.4 1.3.7 1.9 1.8 1.5 2.6z"></path></svg> [long39ng](https://github.com/long39ng) <svg viewBox="0 0 496 512" style="height:1em;position:relative;display:inline-block;top:.1em;" xmlns="http://www.w3.org/2000/svg"> <path d="M336.5 160C322 70.7 287.8 8 248 8s-74 62.7-88.5 152h177zM152 256c0 22.2 1.2 43.5 3.3 64h185.3c2.1-20.5 3.3-41.8 3.3-64s-1.2-43.5-3.3-64H155.3c-2.1 20.5-3.3 41.8-3.3 64zm324.7-96c-28.6-67.9-86.5-120.4-158-141.6 24.4 33.8 41.2 84.7 50 141.6h108zM177.2 18.4C105.8 39.6 47.8 92.1 19.3 160h108c8.7-56.9 25.5-107.8 49.9-141.6zM487.4 192H372.7c2.1 21 3.3 42.5 3.3 64s-1.2 43-3.3 64h114.6c5.5-20.5 8.6-41.8 8.6-64s-3.1-43.5-8.5-64zM120 256c0-21.5 1.2-43 3.3-64H8.6C3.2 212.5 0 233.8 0 256s3.2 43.5 8.6 64h114.6c-2-21-3.2-42.5-3.2-64zm39.5 96c14.5 89.3 48.7 152 88.5 152s74-62.7 88.5-152h-177zm159.3 141.6c71.4-21.2 129.4-73.7 158-141.6h-108c-8.8 56.9-25.6 107.8-50 141.6zM19.3 352c28.6 67.9 86.5 120.4 158 141.6-24.4-33.8-41.2-84.7-50-141.6h-108z"></path></svg> https://lo-ng.netlify.app/ <svg viewBox="0 0 512 512" style="height:1em;position:relative;display:inline-block;top:.1em;" xmlns="http://www.w3.org/2000/svg"> <path d="M464 64H48C21.49 64 0 85.49 0 112v288c0 26.51 21.49 48 48 48h416c26.51 0 48-21.49 48-48V112c0-26.51-21.49-48-48-48zm0 48v40.805c-22.422 18.259-58.168 46.651-134.587 106.49-16.841 13.247-50.201 45.072-73.413 44.701-23.208.375-56.579-31.459-73.413-44.701C106.18 199.465 70.425 171.067 48 152.805V112h416zM48 400V214.398c22.914 18.251 55.409 43.862 104.938 82.646 21.857 17.205 60.134 55.186 103.062 54.955 42.717.231 80.509-37.199 103.053-54.947 49.528-38.783 82.032-64.401 104.947-82.653V400H48z"></path></svg> nguyen@dezim-institut.de <br> <svg viewBox="0 0 448 512" style="height:1em;position:relative;display:inline-block;top:.1em;" xmlns="http://www.w3.org/2000/svg"> <path d="M400 32H48C21.5 32 0 53.5 0 80v352c0 26.5 21.5 48 48 48h352c26.5 0 48-21.5 48-48V80c0-26.5-21.5-48-48-48zM277.3 415.7c-8.4 1.5-11.5-3.7-11.5-8 0-5.4.2-33 .2-55.3 0-15.6-5.2-25.5-11.3-30.7 37-4.1 76-9.2 76-73.1 0-18.2-6.5-27.3-17.1-39 1.7-4.3 7.4-22-1.7-45-13.9-4.3-45.7 17.9-45.7 17.9-13.2-3.7-27.5-5.6-41.6-5.6-14.1 0-28.4 1.9-41.6 5.6 0 0-31.8-22.2-45.7-17.9-9.1 22.9-3.5 40.6-1.7 45-10.6 11.7-15.6 20.8-15.6 39 0 63.6 37.3 69 74.3 73.1-4.8 4.3-9.1 11.7-10.6 22.3-9.5 4.3-33.8 11.7-48.3-13.9-9.1-15.8-25.5-17.1-25.5-17.1-16.2-.2-1.1 10.2-1.1 10.2 10.8 5 18.4 24.2 18.4 24.2 9.7 29.7 56.1 19.7 56.1 19.7 0 13.9.2 36.5.2 40.6 0 4.3-3 9.5-11.5 8-66-22.1-112.2-84.9-112.2-158.3 0-91.8 70.2-161.5 162-161.5S388 165.6 388 257.4c.1 73.4-44.7 136.3-110.7 158.3zm-98.1-61.1c-1.9.4-3.7-.4-3.9-1.7-.2-1.5 1.1-2.8 3-3.2 1.9-.2 3.7.6 3.9 1.9.3 1.3-1 2.6-3 3zm-9.5-.9c0 1.3-1.5 2.4-3.5 2.4-2.2.2-3.7-.9-3.7-2.4 0-1.3 1.5-2.4 3.5-2.4 1.9-.2 3.7.9 3.7 2.4zm-13.7-1.1c-.4 1.3-2.4 1.9-4.1 1.3-1.9-.4-3.2-1.9-2.8-3.2.4-1.3 2.4-1.9 4.1-1.5 2 .6 3.3 2.1 2.8 3.4zm-12.3-5.4c-.9 1.1-2.8.9-4.3-.6-1.5-1.3-1.9-3.2-.9-4.1.9-1.1 2.8-.9 4.3.6 1.3 1.3 1.8 3.3.9 4.1zm-9.1-9.1c-.9.6-2.6 0-3.7-1.5s-1.1-3.2 0-3.9c1.1-.9 2.8-.2 3.7 1.3 1.1 1.5 1.1 3.3 0 4.1zm-6.5-9.7c-.9.9-2.4.4-3.5-.6-1.1-1.3-1.3-2.8-.4-3.5.9-.9 2.4-.4 3.5.6 1.1 1.3 1.3 2.8.4 3.5zm-6.7-7.4c-.4.9-1.7 1.1-2.8.4-1.3-.6-1.9-1.7-1.5-2.6.4-.6 1.5-.9 2.8-.4 1.3.7 1.9 1.8 1.5 2.6z"></path></svg> [anneumann1](https://github.com/anneumann1) <svg viewBox="0 0 512 512" style="height:1em;position:relative;display:inline-block;top:.1em;" xmlns="http://www.w3.org/2000/svg"> <path d="M464 64H48C21.49 64 0 85.49 0 112v288c0 26.51 21.49 48 48 48h416c26.51 0 48-21.49 48-48V112c0-26.51-21.49-48-48-48zm0 48v40.805c-22.422 18.259-58.168 46.651-134.587 106.49-16.841 13.247-50.201 45.072-73.413 44.701-23.208.375-56.579-31.459-73.413-44.701C106.18 199.465 70.425 171.067 48 152.805V112h416zM48 400V214.398c22.914 18.251 55.409 43.862 104.938 82.646 21.857 17.205 60.134 55.186 103.062 54.955 42.717.231 80.509-37.199 103.053-54.947 49.528-38.783 82.032-64.401 104.947-82.653V400H48z"></path></svg> andneumann@outlook.de ] .footnote[ .smaller[View the slides at https://lo-ng.netlify.app/slides/2024-05-28-correlaid-ggplot2-theming] ]